Monday April 21st we are closed due to Easter Monday. Orders placed after Friday April 18th 16:00 will be shipped Tuesday April 22nd.
4.7 avg.
5137+ reviews5137+ reviews
Order by 16:00 for same day shipping
14 days return
EN
Individual
Business
Arduino Project: Alarm
Building and Wiring the Alarm
Now we're going to build the project.
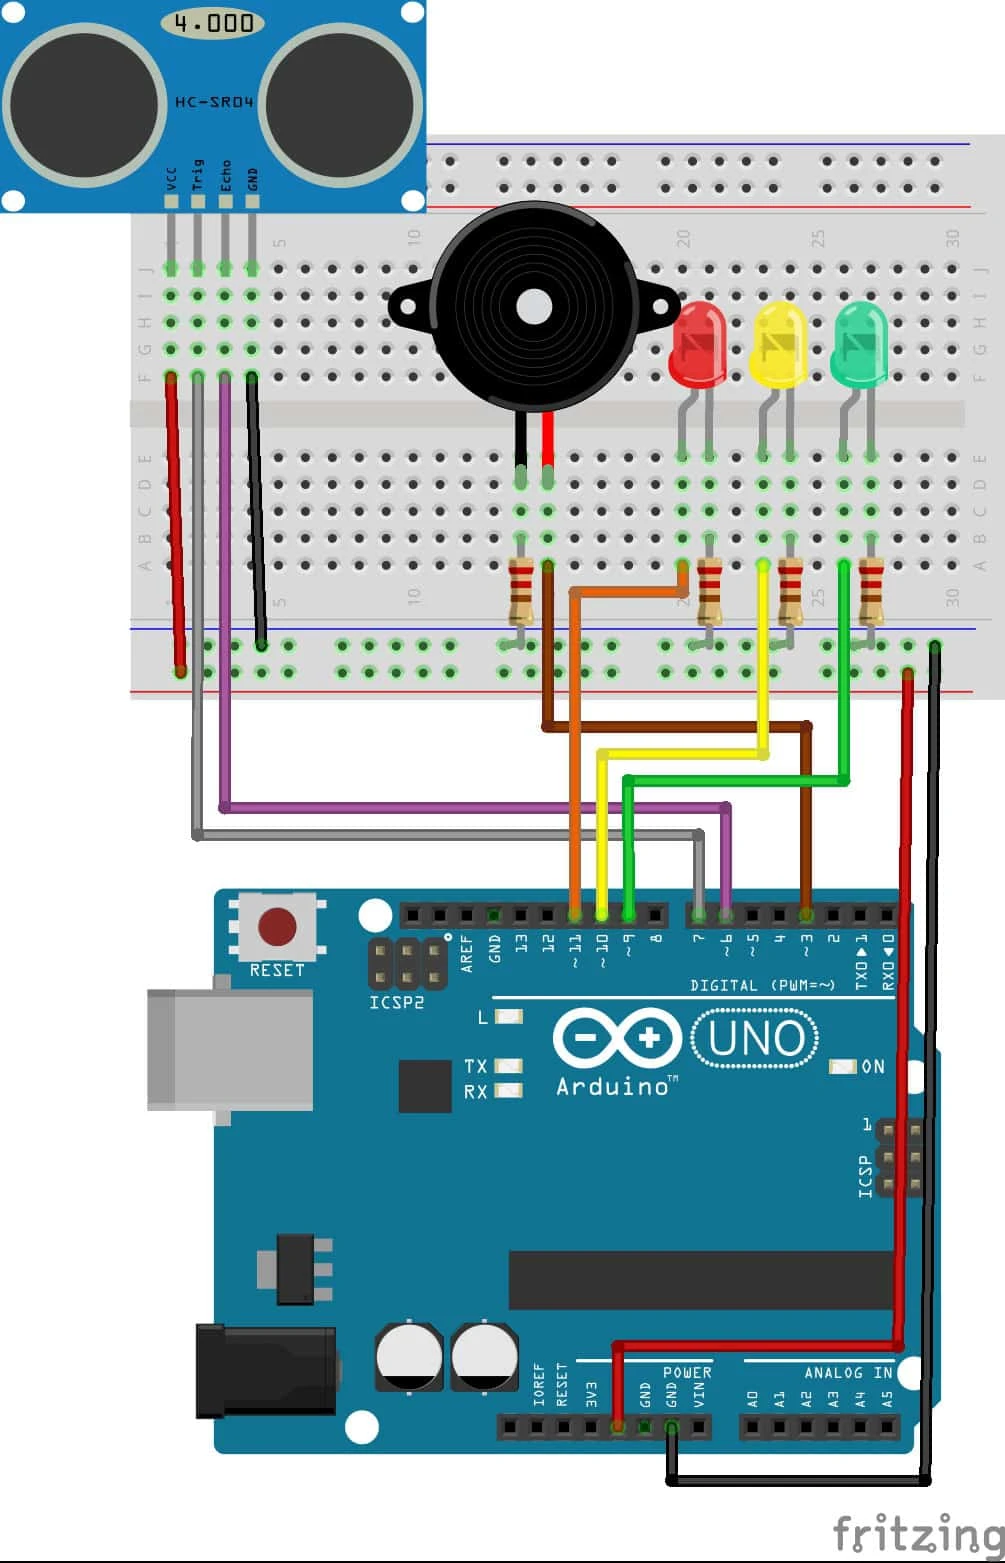
We start by wiring and placing the components on the breadboard, do this according to the photo below, make sure that the ultrasonic sensor is facing the right way, so away from the breadboard. Then the 3 LEDs and buzzer need a resistor. So that the voltage does not become too high and blow up the components. You must pay attention to which pin of the LEDs and buzzer the resistor is connected. The long pin of the LEDs and buzzer is the +, this can be wired directly to the Arduino pins according to the diagram. We connect the resistors to the - (the short pin) of the LEDs and buzzer. These resistors are connected in parallel to the - row of the breadboard. Make sure you connect these components correctly, otherwise your Arduino Alarm will not work! Then connect the remaining jumper wires according to the diagram.
It is also important that you connect the correct components to the correct Arduino pins, otherwise the code will not work!
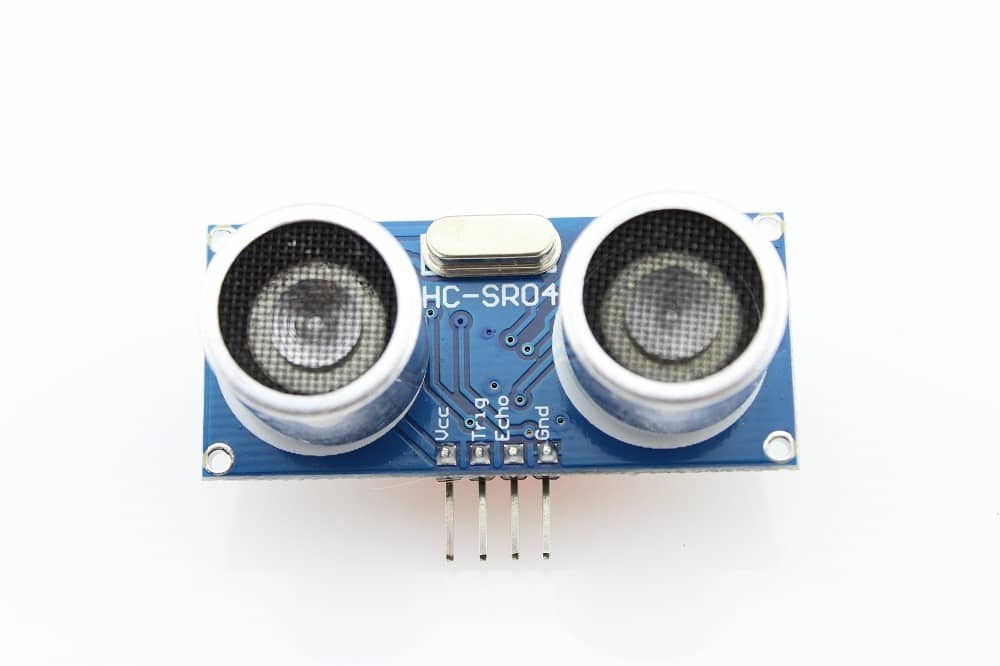
Trig -> pin 7
Echo -> pin 6
Buzzer + -> pin 3
Red LED + -> pin 11
Yellow LED + -> pin 10
Green LED + -> pin 9

Arduino alarm programming
#define trigPin 7           //#define geeft een naam aan de aansluit punten die we gebruiken.
#define echoPin 6
#define greenLed 9
#define yellowLed 10
#define redLed 11
#define buzzer 3

int geluid = 500;           //Hier maken we een variabele aan voor de Hertz (hz) dat de buzzer gaat klinken.

void setup()
{
Serial.begin(9600);           //Hier bereiden we de aansluitpunten en de seriële monitor voor
pinMode(trigPin, OUTPUT);
pinMode(echoPin, INPUT);
pinMode(greenLed,OUTPUT);
pinMode(yellowLed, OUTPUT);
pinMode(redLed, OUTPUT);
pinMode(buzzer, OUTPUT);
}

void loop()
{
long duur;           //Hier maken we nog twee variabelen aan voor de afstand en de duur dat het signaal van de sensor onderweg is.
long afstand;

digitalWrite(trigPin, LOW);           //Hier berekenen we met de duur van het signaal wat de afstand tot het object is.
delayMicroseconds(2);
digitalWrite(trigPin, HIGH);
delayMicroseconds(10);
digitalWrite(trigPin, LOW);
duur = pulseIn(echoPin, HIGH);
afstand = (duur / 2) / 29.1;

Serial.print(afstand);           //Hier schrijven we de afstand op de seriële monitor
Serial.println(” cm”);

if(afstand > 50)           //Als de afstand grote is dan 50cm:
{
digitalWrite(greenLed, HIGH);
digitalWrite(yellowLed, LOW);
digitalWrite(redLed, LOW);
}

else if(afstand < 50 || afstand > 10)            //Als de afstand tussen de 50 en de 10 cm ligt:
{
digitalWrite(greenLed, LOW);
digitalWrite(yellowLed, HIGH);
digitalWrite(redLed, LOW);
}

else if(afstand < 10)           //Als de afstand kleiner is dan 10cm:
{
digitalWrite(greenLed, LOW);
digitalWrite(yellowLed, LOW);
digitalWrite(redLed, HIGH);
tone(buzzer, geluid);
delay(100);
noTone(buzzer);
}

else if(afstand <=0)           //Als de afstand kleiner of gelijk aan 0 is: (foutmelding)
{
Serial.println(“Buiten bereik”);
tone(buzzer, geluid);
delay(500);
noTone(buzzer);
}
delay(300);
}