4.7 avg.
5182+ reviews5182+ reviews
Order by 16:00 for same day shipping
14 days return
EN
Individual
Business
Arduino Project: Arduino Clock
In this project I will show you how to make an Arduino clock yourself
With this Arduino clock you can see the date and time.
In this project we use a 16×2 lcd screen, a real time clock module and a potentiometer. The real time clock (RTC from now on) is actually a watch but in an electronic form. If the power of the Arduino fails, the RTC continues to run because it runs on a small battery. This way it can keep track of time for 7 years. This is especially useful if you want to run the Arduino clock on a battery. If the battery runs out, you don't have to set the time correctly all the time. We use the potentiometer to change the brightness of the lcd screen.
Building and Wiring
Now we are going to build the project
We start by soldering the pin headers onto the RTC. Do this according to the pictures below. If you look closely you will see that I placed the RTC upside down on the breadboard. I did this so that it fits better on the breadboard since my pin headers were not long enough. You have to see for yourself what you find easiest. Make sure that you use the correct connections on the RTC.
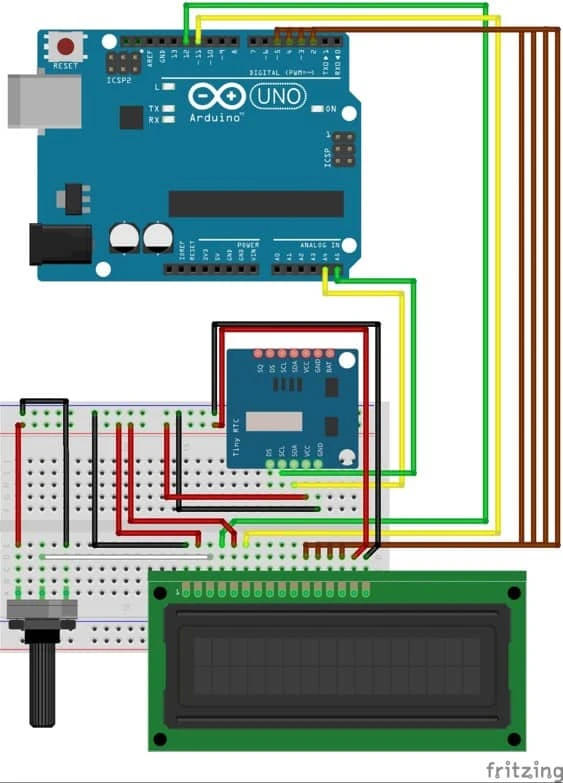
After soldering the pin headers you can place the components according to the drawing. Then you can start wiring the components and the Arduino.
It is important that you connect the correct components to the correct Arduino pins, otherwise the code will not work!
RTC -> Arduino Uno
SCL -> pin A5
SDA -> pin A4
VCC -> 5V
GND -> GND
LCD -> Arduino Uno
VSS -> GND
VDD -> 5V
VO -> potentiometer signal
RS -> pin 12
RW -> GND
E -> pin 11
D4 -> pin 5
D5 -> pin 4
D6 -> pin 3
D7 -> pin 2
A -> 5V
K -> GND
Programming
Now that you have finished wiring and building your Arduino Alarm you can start programming the Arduino Uno .
For this code we also need to add a library.
A Library or Include file often contains code that can be reused in other Sketches. Libraries are often a collection of related functions aimed at a specific application. For example, to control a strip of LEDs, special mathematical functions or to control an LCD screen.
We use the library for the RTC, otherwise it doesn't know what to do.
Download the Library here
To add the Library to the IDE we need to copy or move the RTC folder to the libraries folder.
This folder is normally found in C:\Users\(name)\Documents\Arduino\libraries
You can then copy and paste the code below in its entirety into the Arduino IDE.
Upload the code to the Arduino Uno and see if it works.
If all goes well, the LCD screen will light up and display the correct date and time.
The potentiometer allows you to change the brightness of the LCD screen.
If the LCD screen is on but nothing is displayed, turn the potentiometer left or right.
Now copy the code below into your Arduino program, we recommend that you copy it yourself as you will learn more from this.
#include <Wire.h>
#include <RTClib.h> // zorg ervoor dat je de map RTC in de goede libraries map zet
#include <LiquidCrystal.h>

RTC_DS1307 RTC;

const int rs = 12, en = 11, d4 = 5, d5 = 4, d6 = 3, d7 = 2;
LiquidCrystal lcd(rs, en, d4, d5, d6, d7);


void setup () {
Serial.begin(9600);
Wire.begin();
RTC.begin();
lcd.begin(16, 2);

// de volgende zin verzet de tijd van de RTC naar de tijd wanneer deze code geupload is naar de Arduino
RTC.adjust(DateTime(_DATE, __TIME_));

}
void loop () {
DateTime now = RTC.now();
lcd.setCursor(4,0);
lcd.print(now.day(), DEC);
lcd.print(‘/’);
lcd.print(now.month(), DEC);
lcd.print(‘/’);
lcd.print(now.year(), DEC);
lcd.print(‘ ‘);
lcd.setCursor (4,1);
lcd.print(now.hour(), DEC);
lcd.print(‘:’);
lcd.print(now.minute(), DEC);
lcd.print(‘:’);
lcd.print(now.second(), DEC);
lcd.print(‘ ‘);
delay(1000);
}