
New Raspberry Pi Imager
Raspberry Pi has released a new imager. Here you can easily write software to a micro-SD card. You no longer have to download the image and write it through another imager. Formatting, Writing and Repairing can now be done easily from one tool!
Each Raspberry Pi uses a Micro SD card. Most people will use Raspbian. Previously there was no tool from the Raspberry Pi foundation to write this software to the SD card. Until now! The Raspberry Pi foundation released an imager. With this imager you can easily write the latest software to an SD card. You can choose whether you want to write standard Raspbian or another version. But you can also write LibreELEC or Ubunte directly from the imager. Another function is to perform an "EEPROM boot recovery". If your Pi no longer starts up, you can try this function.
You can now also format an SD card to FAT32 straight from the imager. At first, a separate tool such as ”SD Formatter” was needed.
If you want to use a different image on your Raspberry Pi then you can select it under the heading ”Use custom”. Here you can select an .img file as with a standard imager tool.
Our experience
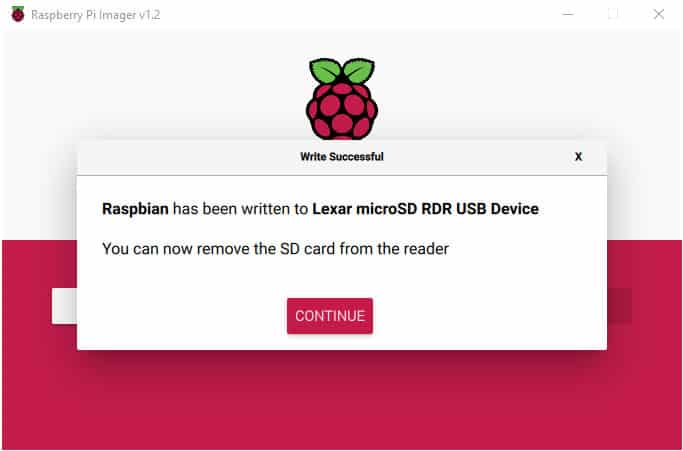
The new Raspberry Pi Imager is very clear and easy to use. A nice feature is that after writing the file is automatically checked. If something goes wrong, you will be notified and you can rewrite the file.
We have now extensively used and tested the new tool. We will not be going back to our old imager anytime soon.
Suitable systems for the Raspberry Pi Imager
De Raspberry Pi Imager is available for Windows, MacOS & Ubuntu. You can download the Imager from one of the links below.
Do you prefer to use Noobs? You can download this from the downloads page on the Raspberry Pi website. Noobs do not write to an SD card, but copy. You do not need an Imager for this.
Raspberry Pi also published an article about their new Imager: Click here to read that message.


Raspberry Pi Projects
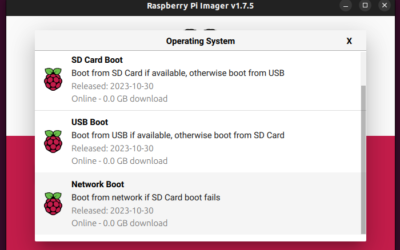
Raspberry Pi USB and Network boot
Raspberry Pi start from USB or Network. Below we explain how to start your Raspberry Pi can boot from USB. In addition, we will immediately show you how to install Raspberry OS over the network. For this you will need a small Micro SD...
Raspberry Pi Pico – Lesson 6: Raspberry Pi Pico with WiFi for a mini web server
Raspberry Pi Pico - Lesson 6: Raspberry Pi Pico with WiFi for a Mini Web Server Take the next step in your programming adventure with Lesson 6, where we build a WiFi Mini Web Server with the Raspberry Pi Pico. This engaging lesson is perfect for beginners who want...
Raspberry Pi Pico – Lesson 5: Raspberry Pi Control Pico Servo
Raspberry Pi Pico - Lesson 5: Raspberry Pi Controlling Pico Servo Continue your programming adventure during Lesson 5, where we control an SG90 servo with the Raspberry Pi Pico. This educational lesson is ideal for beginners who want to start with the Thonny programming tool and...
Stay up to date with the latest Raspberry Pi news!
Sign up for our newsletter
Stay informed of all news, new products, offers and projects.
Follow us
For news, offers and instructional videos.
mmm it said before the X: cntrl shift. In brackets. This will take you to the advanced options part. And that part is even more fun
regards
extensively tested?
You forgot the advanced options……
X
Hi Eric,
This is an old message.
The advanced options are listed under another (new) article (https://elektronicavoorjou.nl/nieuwe-update-raspberry-pi-imager-v1-6/There it is under the heading Ctrl-Shift-X. This is key command to open the advanced menu.
Is there a particular feature in the advanced menu that you would like us to write more about?
Yours faithfully,
Electronics For You