Raspberry Pi project: Servo Control
This servo project with Raspberry Pi is a great way to learn how to add movement and control to your projects. With a servo you can perform precise and controlled movements, allowing you to control a robot arm or a camera remotely, for example. In this project we will teach you the basics of controlling a servo.
This manual covers:
- Level - Beginner 25%
- Duration 15 min 25%
- Costs €103,19 30%
Step 1: Supplies:
Step 2: Connecting
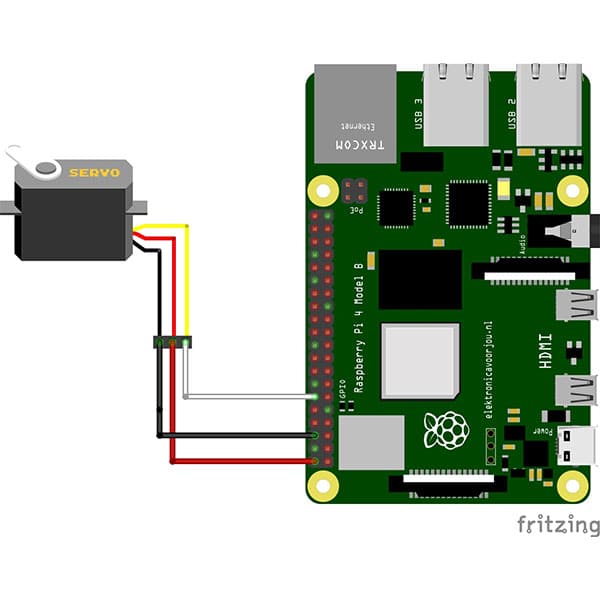
To begin with, we must first connect the servo motor to the Raspberry Pi. You do this by connecting the jumper wires to the Servo Motor. Then we connect the jumper wire that is attached to the servo motor to the Raspberry Pi 4B. Connect the wires to the following pins: The red jumper wire to PIN 2 (5volt). The black jumper wire on PIN 6 (Ground) and the last jumper wire on PIN 12 (BCM 18).

Step 3: Programming
If everything is connected properly and your Pi is working properly, we can start writing the code to run the Servo. Open on you Raspberry Pi the Thonny programming environment. Then create a new file called servo_project.py (you can call it anything you want, as long as it has “.py” after it!) Save this file and start writing the following code:
from gpiozero import AngularServo
from time import sleep
servo = AngularServo(18, min_pulse_width=0.0006, max_pulse_width=0.0023)
while (True):
servo.angle = 90
sleep (2)
servo.angle = 0
sleep (2)
servo.angle = -90sleep (2)
You use this code to control your servo motor. Let's take a look at the code line by line and see which line does what!
The code starts by importing the AngularServo and Sleep libraries.
servo = AngularServo(18, min_pulse_width=0.0006, max_pulse_width=0.0023)
Using this piece of code, we will create a variable called servo. In this case we say that the data pin is GPIO 18. And we say what the min and max pulse width is, which is 0.0006 and 0.0023.
while (True):
servo.angle = 90
sleep (2)
servo.angle = 0
sleep (2)
servo.angle = -90sleep (2)
Here we make an endless loop using a “While (True)” statement. The servo here goes from the 90 degree angle to the 0 degree angle to the -90 degree angle. With a 2 second break in between.
Step 4: Result
You now have the Servo connected to you Raspberry Pi and written the code that will cause the Servo to run. Save your file and click on “Run” (big green button in “Thonny” with a play button in it”) And see what happens! Is your servo not working? Then take a look at the previous steps and try again!
Did you enjoy doing this project? Take a look at one of our other projects!
