
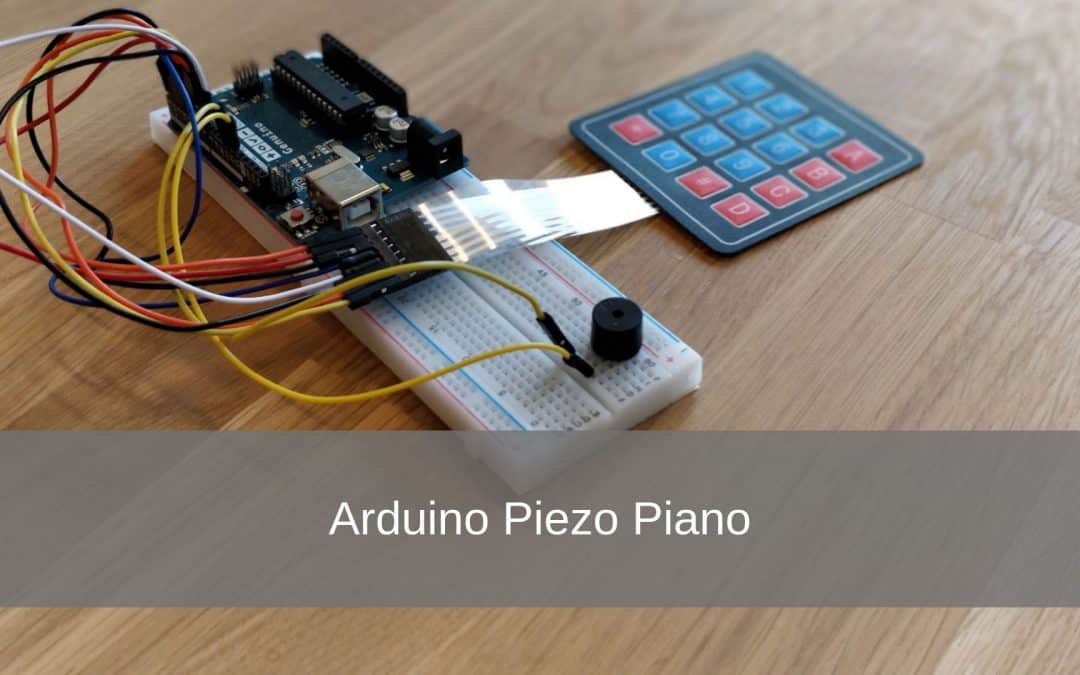
In this project I will show you how to make an Arduino piezo piano yourself.
With this simple and inexpensive project you can very quickly demonstrate how a keypad works on the Arduino. In this project we use a Arduino UNO, a breadboard and a digital 4×4 keypad.
- Level - Beginner 20%
- Duration - 10 / 15Min 20%
- Costs - € 38,70 euros complete 25%
Step 1: Supplies Arduino Piezo Piano
1X breadboard
10X jumper wires
1X piezo buzzer
1X Keypad 4×4
Step 2: Building and Wiring
Now we are going to put the project together.
We start by connecting the keypad to the Arduino. You do this in a specific order: The first 4 pins go into digital ports 4 to 7, the last 4 ports go to digital 0 to 3. You connect these by means of the jumpers, directly in the UNO.
After you have connected the keypad you can connect the buzzer to the breadboard place. There is a plus on the Buzzer, you loop it through the breadboard and a jumper wire to port 11 on the Arduino. You connect the minus to any GND port on the UNO.
Also see all this via the attached Fritzing.

Step 3: Program Arduino
Now that you're done wiring and building your Arduino Piezo Piano, you can start programming the Arduino Uno.
We need to add a library for this code.
A Library or Include file often contains code that can often be reused in other Sketches. Often libraries (libraries) are a collection of related functions aimed at a particular application. For example to control a strip with LEDs, special mathematical functions or, for example, to control an LCD screen.
We use the library for the keypad, otherwise the Arduino does not know what to do with the incoming pulses.
We do this by copying the Keypad folder or moving it to the libraries folder.
this folder is normally found in http://arduino.cc/playground/uploads/Code/keypad.zip
Otherwise you can get the Library from here: https://gist.github.com/mikeputnam/2820675
You can copy the code below to the Arduino IDE
/*Elektronicavoorjou.nl Project Piezo piano
Supplies
Arduino Uno
10 M / M Jumper wires
1 breadboard
1 piezo buzzer
4 * 4 Keypad * /
#include "Keypad.h"
#include "pitches.h"
#define GND 12
const byte ROWS = 4; // Number of rows
const byte COLS = 4; // Number of columns
const int SPEAKER = 11;
// define symbols on keypad
char hexaKeys [ROWS] [COLS] = {
{'1 ′,' 2 ′, '3 ′,' A '},
{'4 ′,' 5 ′, '6 ′,' B '},
{'7 ′,' 8 ′, '9 ′,' C '},
{'*', '0 ′,' # ',' D '}};
byte rowPins [ROWS] = {3, 2, 8, 0}; // connect row to pinouts on keypad
byte colPins [COLS] = {7, 6, 5, 4}; // connect column to pinouts on keypad
// initialize instance called NewKeypad
Keypad customKeypad = Keypad (makeKeymap (hexaKeys), rowPins, colPins, ROWS, COLS);
void setup ()
{
Serial.begin (9600);
pinMode (GND, OUTPUT);
digitalWrite (GND, LOW);
}
void loop ()
{
char customKey = customKeypad.getKey ();
if (customKey == '0 ′)
{
Serial.println (customKey);
tone (SPEAKER, NOTE_C4,350);
}
if (customKey == '1 ′)
{
Serial.println (customKey);
tone (SPEAKER, NOTE_D4,350);
}
if (customKey == '2 ′)
{
Serial.println (customKey);
tone (SPEAKER, NOTE_E4,350);
}
if (customKey == '3 ′)
{
Serial.println (customKey);
tone (SPEAKER, NOTE_F4,350);
}
if (customKey == '4 ′)
{
Serial.println (customKey);
tone (SPEAKER, NOTE_G4,350);
}
if (customKey == '5 ′)
{
Serial.println (customKey);
tone (SPEAKER, NOTE_A4,350);
}
if (customKey == '6 ′)
{
Serial.println (customKey);
tone (SPEAKER, NOTE_B4,350);
}
if (customKey == '7 ′)
{
Serial.println (customKey);
tone (SPEAKER, NOTE_C5,350);
}
if (customKey == '8 ′)
{
Serial.println (customKey);
tone (SPEAKER, NOTE_D5,350);
}
if (customKey == '9 ′)
{
Serial.println (customKey);
tone (SPEAKER, NOTE_E5,350);
}
if (customKey == 'A')
{
Serial.println (customKey);
tone (SPEAKER, NOTE_F5,350);
}
if (customKey == 'B')
{
Serial.println (customKey);
tone (SPEAKER, NOTE_G5,350);
}
if (customKey == 'C')
{
Serial.println (customKey);
tone (SPEAKER, NOTE_A5,350);
}
if (customKey == 'D')
{
Serial.println (customKey);
tone (SPEAKER, NOTE_B5,350);
}
if (customKey == '*')
{
Serial.println (customKey);
tone (SPEAKER, NOTE_C6,350);
}
if (customKey == '#')
{
Serial.println (customKey);
tone (SPEAKER, NOTE_D6,350);
}
}
It doesn't work yet. You have to add an extra tab.

Name this tab pitches.h
Then add the code below.
/ *************************************************
* Public Constants
************************************************* /
#define NOTE_B0 31
#define NOTE_C1 33
#define NOTE_CS1 35
#define NOTE_D1 37
#define NOTE_DS1 39
#define NOTE_E1 41
#define NOTE_F1 44
#define NOTE_FS1 46
#define NOTE_G1 49
#define NOTE_GS1 52
#define NOTE_A1 55
#define NOTE_AS1 58
#define NOTE_B1 62
#define NOTE_C2 65
#define NOTE_CS2 69
#define NOTE_D2 73
#define NOTE_DS2 78
#define NOTE_E2 82
#define NOTE_F2 87
#define NOTE_FS2 93
#define NOTE_G2 98
#define NOTE_GS2 104
#define NOTE_A2 110
#define NOTE_AS2 117
#define NOTE_B2 123
#define NOTE_C3 131
#define NOTE_CS3 139
#define NOTE_D3 147
#define NOTE_DS3 156
#define NOTE_E3 165
#define NOTE_F3 175
#define NOTE_FS3 185
#define NOTE_G3 196
#define NOTE_GS3 208
#define NOTE_A3 220
#define NOTE_AS3 233
#define NOTE_B3 247
#define NOTE_C4 262
#define NOTE_CS4 277
#define NOTE_D4 294
#define NOTE_DS4 311
#define NOTE_E4 330
#define NOTE_F4 349
#define NOTE_FS4 370
#define NOTE_G4 392
#define NOTE_GS4 415
#define NOTE_A4 440
#define NOTE_AS4 466
#define NOTE_B4 494
#define NOTE_C5 523
#define NOTE_CS5 554
#define NOTE_D5 587
#define NOTE_DS5 622
#define NOTE_E5 659
#define NOTE_F5 698
#define NOTE_FS5 740
#define NOTE_G5 784
#define NOTE_GS5 831
#define NOTE_A5 880
#define NOTE_AS5 932
#define NOTE_B5 988
#define NOTE_C6 1047
#define NOTE_CS6 1109
#define NOTE_D6 1175
#define NOTE_DS6 1245
#define NOTE_E6 1319
#define NOTE_F6 1397
#define NOTE_FS6 1480
#define NOTE_G6 1568
#define NOTE_GS6 1661
#define NOTE_A6 1760
#define NOTE_AS6 1865
#define NOTE_B6 1976
#define NOTE_C7 2093
#define NOTE_CS7 2217
#define NOTE_D7 2349
#define NOTE_DS7 2489
#define NOTE_E7 2637
#define NOTE_F7 2794
#define NOTE_FS7 2960
#define NOTE_G7 3136
#define NOTE_GS7 3322
#define NOTE_A7 3520
#define NOTE_AS7 3729
#define NOTE_B7 3951
#define NOTE_C8 4186
#define NOTE_CS8 4435
#define NOTE_D8 4699
#define NOTE_DS8 4978
This code works but still needs to be adjusted to function ideally.
We leave this to you because you will then really start programming!
Do you really want to learn to play the piano? Here you can find everything about playing the piano.