In this fun project you will learn how to make your own Arduino calculator can make.
You can use this calculator for simple calculations. These are plus, minus, times or divided by. So don't expect to be able to solve equations with it.
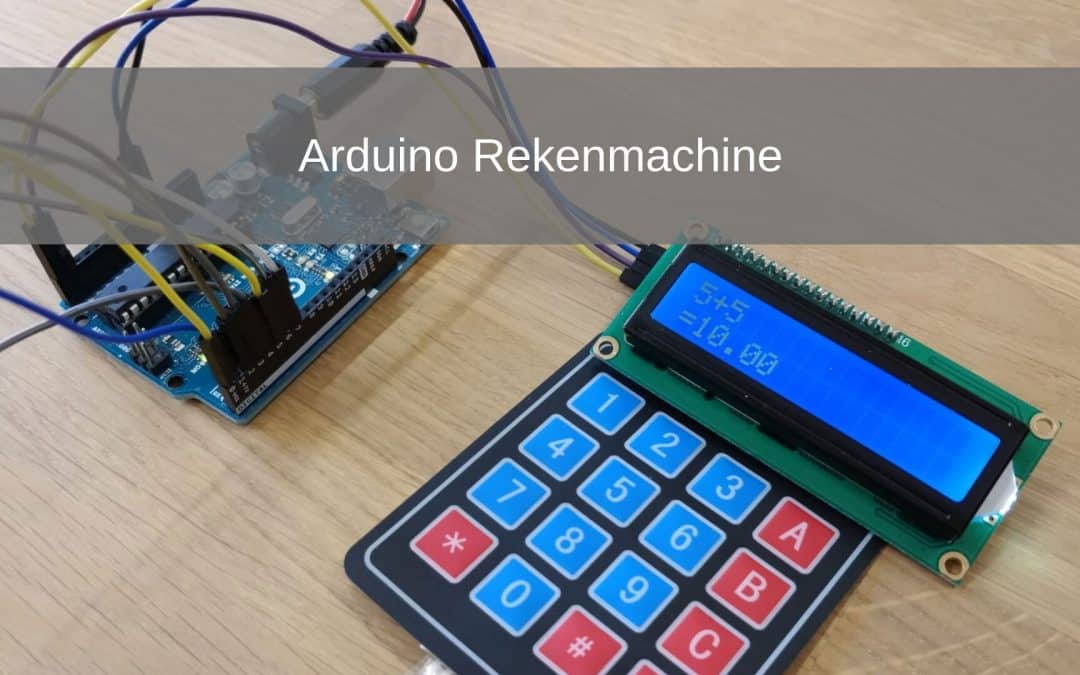
We do this using a 4X4 keypad and a 16X2 LCD screen. We connect the screen via I2C, so keep in mind that you need extra libraries. For the keypad you have to import the keypad library, more information about this can be found in the piezo piano project. For the I2C libraries you will find the information in the I2C LCD project.
- Level - Medium 40%
- Duration - 20/25 Min 25%
- Costs - € 42.80 euros complete 40%
Step 1: Requirements
1X Arduino UNO
12X Jumper wires
1X 4X4 Keypad
1X 16X2 LCD
Step 2: Building and Wiring

Step 3: Programming
Now that you are programming, keep in mind that you need the Wire, Keypad and LiquidCrystal_I2C libraries.
During programming we define the * and the # as other symbols. The * is the clear function so C and the # is it is sign and is thus defined as =.
As soon as all the code is on it and you look at your Arduino, the screen first shows “electronics for your calculator”. Then the screen goes blank and you can start making calculations.
In case you already press the C sign before you have calculated a sum and you want to continue calculating, you will notice that it does not work. It is important that you first press the = sign if you do not do this because it does not work.
// the libraries we need
#include
#include
#include
// keypad definitions
const byte ROWS = 4;
const byte COLS = 4;
char keys [ROWS] [COLS] = {
{'1', '2', '3', '+'},
{'4', '5', '6', '-'},
{'7', '8', '9', '*'},
{'C', '0', '=', '/'}
};
byte rowPins [ROWS] = {0, 1, 2, 3};
byte colPins [COLS] = {4, 5, 6, 7};
Keypad ourKeypad = Keypad (makeKeymap (keys), rowPins, colPins, ROWS, COLS);
// initialize lcd
LiquidCrystal_I2C lcd (0x3F, 20,4);
// say here what these values are
boolean firstNumState = true;
String firstNum = “”;
String secondNum = “”;
float answer = 0.0;
char oper = '';
void setup () {
// here we turn on the screen
lcd.begin (16,2);
lcd.init ();
lcd.init ();
lcd.backlight ();
lcd.setCursor (0,0);
lcd.print (“Electronics”);
lcd.setCursor (0,1);
lcd.print (“For You”);
delay (1500);
lcd.clear ();
lcd.setCursor (0,0);
lcd.print (“calculator”);
delay (1500);
lcd.clear ();
}
void loop () {
char newKey = ourKeypad.getKey ();
// what to do when he gets a number
if (newKey! = NO_KEY && (newKey == '1' || newKey == '2' || newKey == '3' || newKey == '4' || newKey == '5' || newKey = = '6' || newKey == '7' || newKey == '8' || newKey == '9' || newKey == '0 ′)) {
if (firstNumState == true) {
firstNum = firstNum + newKey;
lcd.print (newKey);
Else {}
secondNum = secondNum + newKey;
lcd.print (newKey);
}
}
// what to do if he gets an operator
if (newKey! = NO_KEY && (newKey == '+' || newKey == '-' || newKey == '*' || newKey == '/')) {
if (firstNumState == true) {
oper = newKey;
firstNumState = false;
lcd.print (oper);
}
}
// here we say what happens when you
// press #
if (newKey! = NO_KEY && newKey == '=') {
// what to do as your operator
// + is
if (oper == '+') {
antw = firstNum.toFloat () + secondNum.toFloat ();
}
// what to do as your operator
// - is
if (oper == '-') {
antw = firstNum.toFloat () - secondNum.toFloat ();
}
// what to do as your operator
// * is
if (oper == '*') {
antw = firstNum.toFloat () * secondNum.toFloat ();
}
// what to do as your operator
// divided by is
if (oper == '/') {
antw = firstNum.toFloat () / secondNum.toFloat ();
}
lcd.setCursor (0,0);
lcd.print (firstNum);
lcd.print (oper);
lcd.print (secondNum);
lcd.setCursor (0,1);
lcd.print (“=”);
lcd.print (antw);
firstNumState = true;
}
if (newKey! = NO_KEY && newKey == 'C') {
// here we say what happens when you
// press *
lcd.clear ();
lcd.setCursor (0,0);
firstNum = “”;
secondNum = “”;
answer = 0;
oper = '';
}
}