
Raspberry Pi Pico – Lesson 3: Raspberry Pi Pico temperature sensor
Dive into a fascinating project with the Raspberry Pi Pico: reading a temperature sensor with MicroPython. This lesson is ideal for beginners who want to get acquainted with the Thonny programming tool and MicroPython. Easily learn how to use the Raspberry Pi Connect Pico to your computer, upload programs and read the temperature sensor. Discover the world of temperature measurements with the Pico, while being guided step by step. Start your programming adventure with this practical and educational project for the Raspberry Pi pico!
This manual covers:
- Level - Beginner 25%
- Duration 20 min 25%
- Costs €20,40 20%

Step 1 – Requirements for the temperature sensor with the Raspberry Pi Pico
Step 2 – Install software on the Raspberry Pi Pico for the temperature sensor
You can skip this step if you already did it in Lesson 1.
Around the Raspberry PiTo be able to program with MicroPython, we must first flash the firmware of the Pico.
This means that we provide the internal software that starts the pico with a special Python version.
Download firmware from the website below (uf2 file)
https://micropython.org/download/RPI_PICO/
https://micropython.org/download/RPI_PICO_W/
(Make sure you select the correct version of the firmware, the WiFi version and the non-WiFi version are different)
Press the white boot button on the pico and keep it pressed.
Plug the pico into a USB port on your computer. (Then you can release the button)
There will now be a drive letter, as accessible with a memory stick.
Copy the firmware file RPI_PICO_xxxxxx.uf2 to this drive
(pico will restart and the firmware will be installed)
Download and install Thonny on your PC.
(https://thonny.org/)
Select the MicroPython Interpreter below
Tools > Options > Interpreter > MicroPython (Raspberry Pi Pico)

Place the components as shown below on a breadboard.
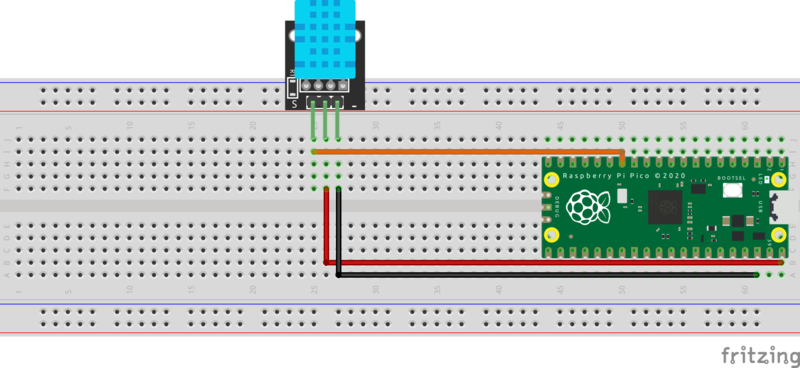
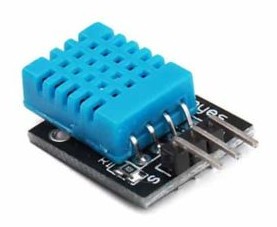
The PCB at the sensor below has a built-in pullup resistor of 10K.
If you have a sensor without the PCB, you may need to place a 10K resistor between the data and Vcc.
The order of pins are usually .
VCC, Data, GND in the case of 3 pins,
If there are four pins, the 3rd is usually not connected.
VCC, Data, NC, GND
However, the sensor is on a PCB with an S on the left side.
These should be connected as follows: Data(signal), VCC and right GND
Step 3 – Programming the Raspberry Pi Pico to measure temperature
Now you can type in the program below in the Thonny interface.
from machine import Pin from time import sleep import dht sensor = dht.DHT11(Pin(10)) while True: try: sleep(2) sensor.measure() temp = sensor.temperature() hum = sensor.humidity() print ('Temperature: %3.1f C' %temp) print('Humidity: %3.1f %%' %hum) except OSError as e: print('Cannot read sensor data.')
Explanation of the program:
- Import the pin class from the python machine module
- Import the sleep class from the Python time module
- import the dht module, this is suitable for the DHT11 and the DHT22
- .
- define variable sensor
- .
- here an infinite repeat loop is started
- the line together with line 15, provide error message handling.
If the sensor cannot be read, a message is displayed on the screen via line 16. - sleep 2 seconds, the DHT11 can be read faster than the DHT22
- measure the values routine is called
- In the variable temp we put the read-out temperature of the sensor
- so does the humidity in the hum variable
- print the text temperature followed by the temperature value in the format %3.1f
Format:
In Python it becomes
%3.1fused as a formatting specification with the string formatting operator%to control the display of floating-point numbers.-
%: This is the string formatting operator in Python. -
3: This specifies the minimum width of the entire field. If the value to be formatted is less than this width, it will be padded on the left with spaces. -
.1: This indicates the precision of the floating-point number. In this case, it means there must be one digit after the decimal point. -
f: This is the type code indicating that the value should be formatted as a floating-point number.
-
- This also applies to the humidity level
- Error message handling
- print line error message
Then press save and save the program on your own computer.
Press the red stop sign button to restart the backend.
(Thonny will now reconnect to your Pico)
Then you could press the green button (Run current script).
If the pico is now removed from the computer and reconnected, the program will not be started.
We only tested the programming code.
To enable automatic starting, we must save the program again, but then select the pico.
File > Save As > Raspberry Pi Pico

Save the program with its name main.py. The pico will automatically start the program with this name when connecting the Pico to a USB port.
In this case you do need a connection with your PC and Thonny to see the measured results!
Step 4 – Result: read temperature with the Raspberry Pi Pico
You now have your own Raspberry Pi Pico temperature sensor built and programmed.
Did you enjoy doing this project? Check out our other projects, or Les come from this Pico series!